
Complete Guide 2026
🇵🇭
NBI Clearance Philippines 2026Online Application, Renewal, and Requirements
Apply for your NBI clearance online for work, travel, visa applications, or government requirements. Create an account, book an appointment, pay with GCash, and track your application from home. First-time applicants visit the office once, while many renewals are fully online with home delivery.
✓ Apply Online
✓ Pay with GCash
✓ Home Delivery
Overview
What Is NBI Clearance?
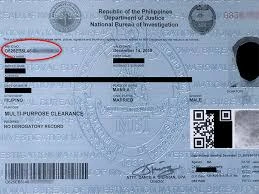
NBI clearance is an official document issued by the National Bureau of Investigation in the Philippines. It confirms that you have no criminal record in the NBI national database. When someone asks you to submit an NBI clearance, what they are really asking for is proof that you are not involved in any pending criminal case in the country.
Different from police clearance
It is different from a police clearance. The PNP clearance checks the Philippine National Police database while the NBI clearance checks a separate national database maintained by the NBI. Some employers and agencies require both. If you are not sure which one is being asked for, always confirm before you apply.
Common Uses
What Is NBI Clearance Used For?
A lot of people only think about getting an NBI clearance when they urgently need it for something. Here are the most common reasons people apply.
Employment
Most companies require it before they hire you, whether you are applying locally or for an overseas job.
Visa and travel abroad
Many embassies and immigration offices require an NBI clearance as part of your background documents.
Government transactions
Applying for licenses, permits, and other official government documents often requires a current clearance.
Bank loans
Some banks ask for an NBI clearance when processing large loan amounts.
Personal use
Some people simply keep one on hand as proof of a clean record and for many other processes.
Checklist
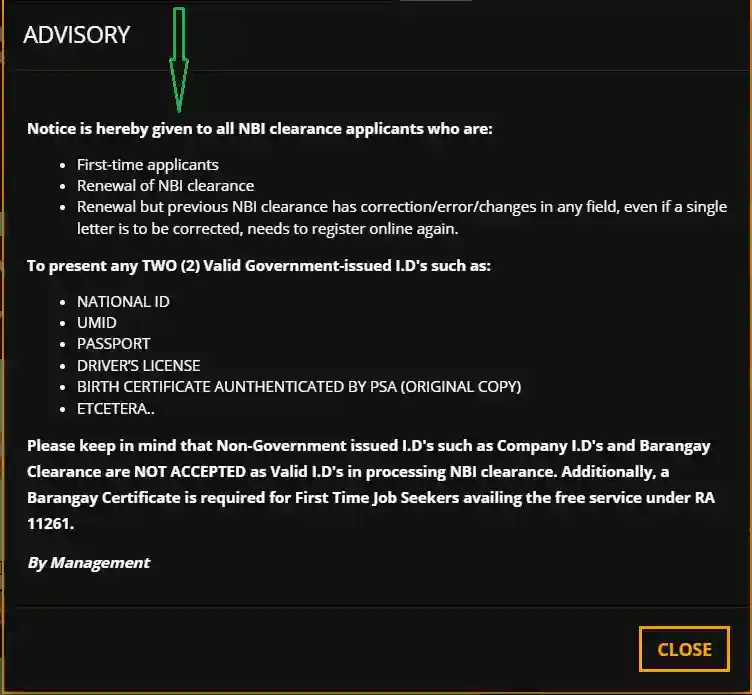
NBI Clearance Requirements
Before you start your application, prepare these documents.
Regular Applicants
- Two valid government-issued IDs. Both must be original, not expired, and no photocopies. You must bring the originals.
- Accepted IDs: passport, driver’s license, UMID, SSS ID, GSIS ID, postal ID, voter’s ID, PRC license, PhilHealth ID, and national ID.
- Two recent 2×2 passport-sized photos with a white background
For Renewal
- Your original expired NBI clearance
- Two valid government-issued IDs
First-Time Job Seekers
- A barangay certificate confirming your status as a first-time job seeker
- One valid ID
- No application fee under Republic Act 11261
Important note on IDs
Company IDs and barangay clearances are not accepted as valid IDs for the NBI clearance application. You are required to bring government-issued IDs only.
How to Apply for NBI Clearance Online? (Step-by-Step)
The entire initial process can be done online through the official NBI clearance website. To apply online follow the steps given below:
STEP
1
Visit Official NBI Clearance Website
Choose your purpose of visit from the dropdown and select the nearest police station for processing.
Step 1
STEP
2
Register Your Account
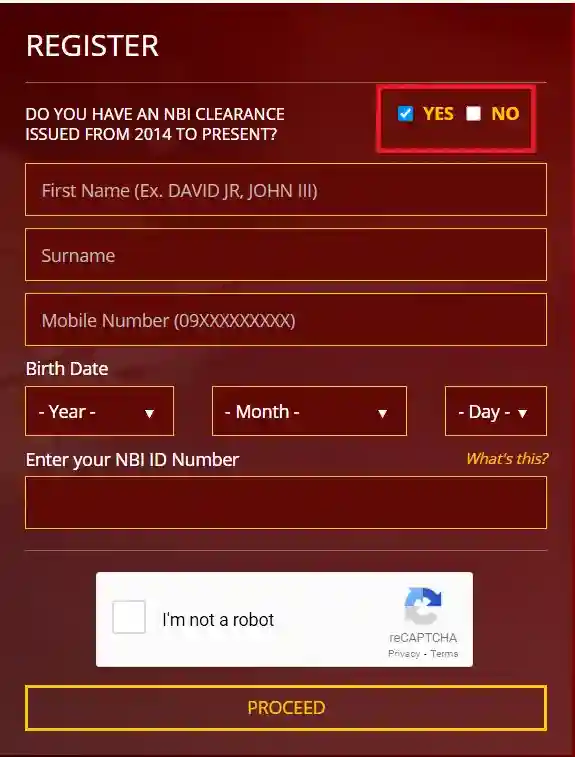
Step 2
STEP
3
Verify your OTP
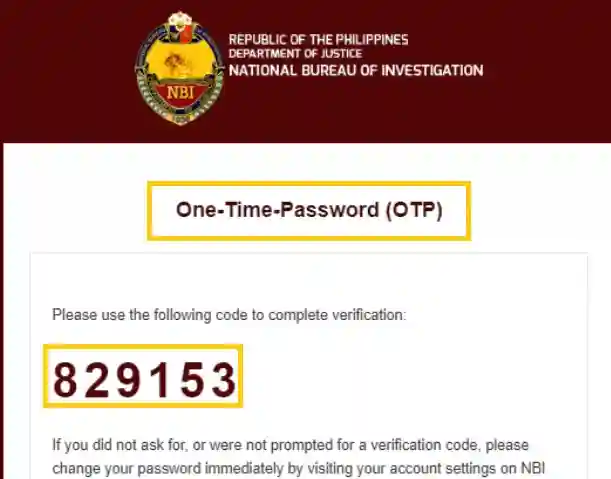
Step 3
STEP
4
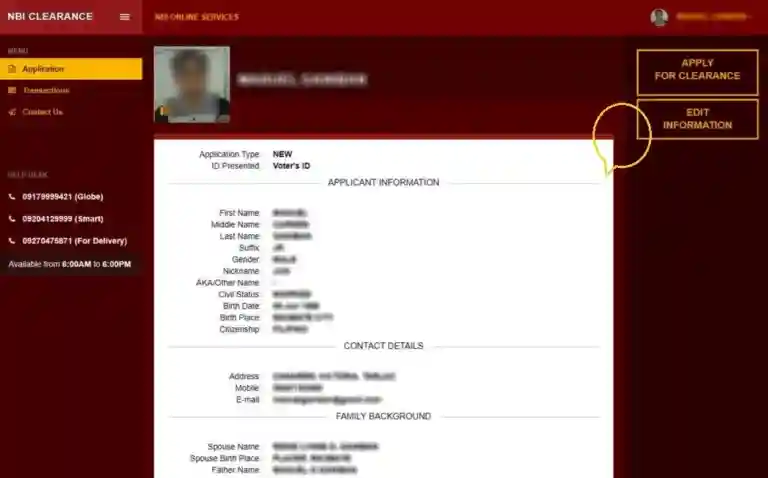
Complete Your Profile
Once your account is verified and you are logged in, fill in the rest of your personal information.
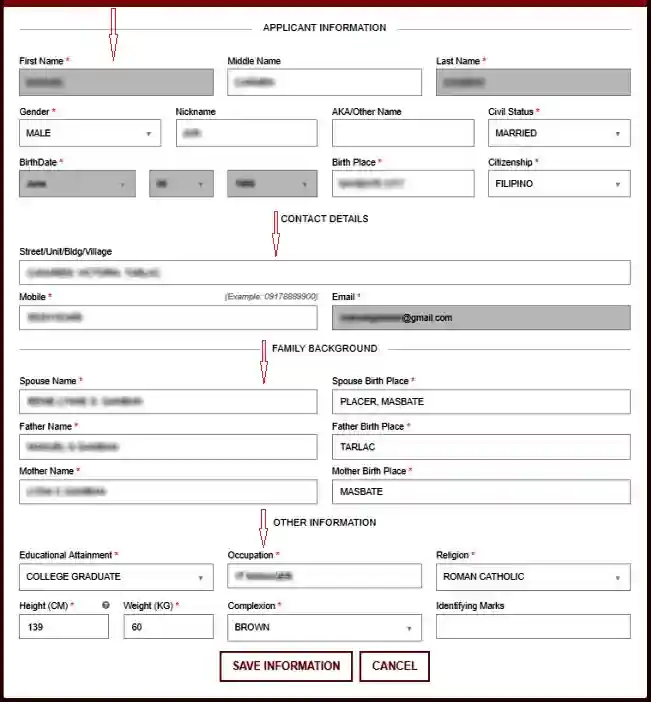
Step 4
STEP
5
Apply for Clearance
Step 5
STEP
6
Select your Valid IDs
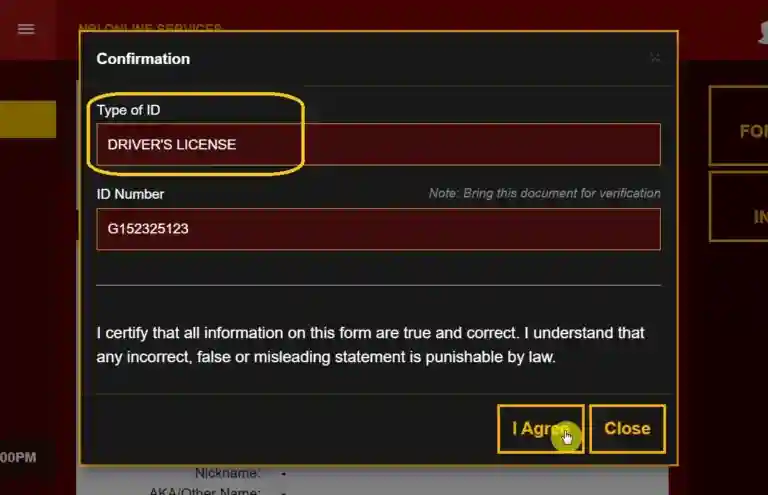
Step 6
STEP
7
Book your NBI Clearance Appointment
Step 7
STEP
8
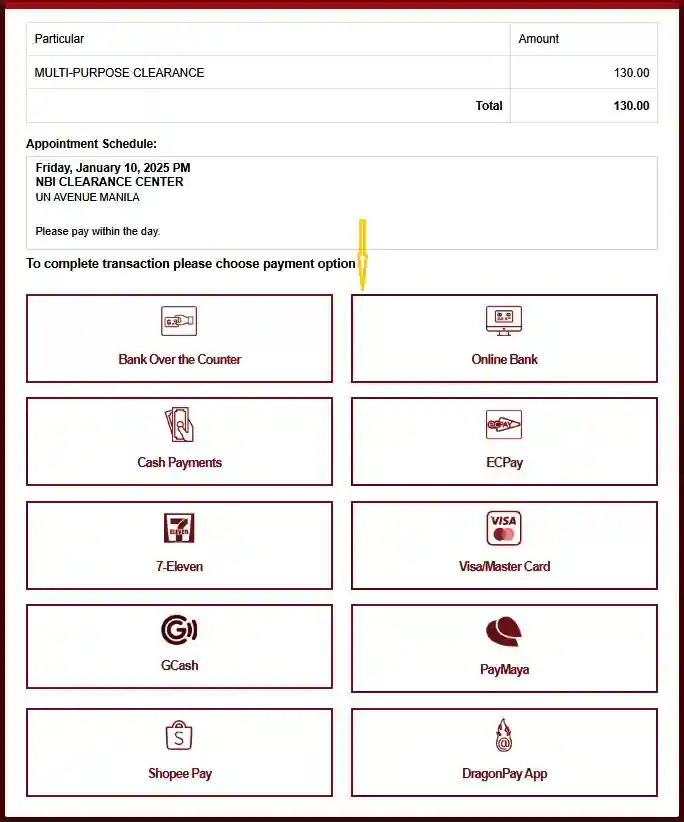
Pay NBI Clearance Fee
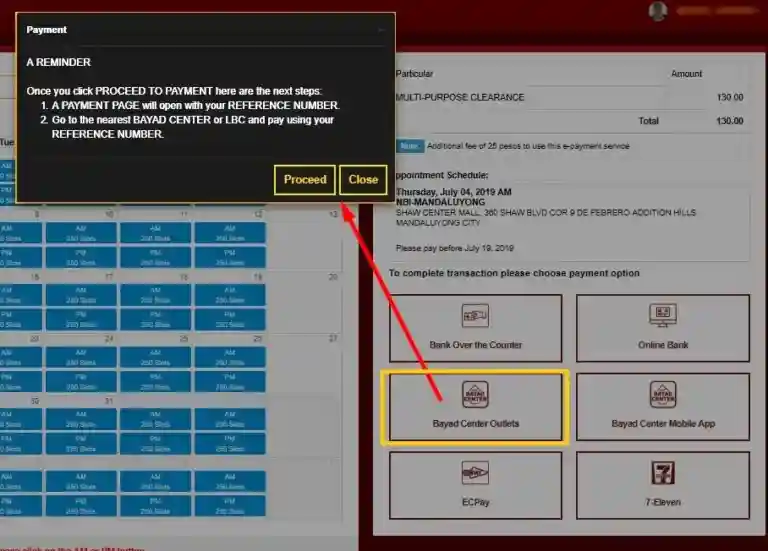
After booking your appointment, you need to pay the 155 peso fee. To pay the fee you can choose from the available NBI clearance payment options:
After making payment, save your reference number and payment receipt. As on the appointment day you will present them to the staff if asked.
Step 8
STEP
9
Print Your Application Form
Log in to your account, go to transactions, click on your application, and then click on print. Save it as a PDF or print it directly. Don’t forget to carry a printed application form along with your payment receipt and valid IDs on your appointment day.
Step 9
STEP
10
Visit NBI Branch
Visit the NBI clearance branch you selected on your scheduled date and time. Bring:
When you arrive, go to the help desk and show your printed application. You will then proceed to the biometrics section where the NBI staff will take your photo and fingerprints.
Step 10
STEP
11
Receive your NBI clearance
If your application didn’t receive any HIT status then your clearance will be released on the same day of your appointment, usually within a few hours. If your application gets a hit, you will need to re-visit the branch after 5 to 10 working days for further verification.
Step 11
For Regular Applicants
If you already have a previous NBI clearance issued from 2016 onwards, the system will ask you about this and you need to click on the renewal link. Select Yes and provide your old clearance details if asked.
For First Time Jobseekers
If you are a first time jobseeker then you should select the first time job seeker option and if you already have old clearance then select link for renewal.
Payment Guide
How to Pay NBI Clearance Using GCash
Paying through GCash is one of the fastest and most convenient options. Here is how to do it.
1
Select GCash as payment
After booking your appointment, start the payment process. Select GCash as your payment method, or choose another method if you prefer.
2
Copy the reference number
The system will generate a reference number. Copy it.
3
Open GCash and go to Pay Bills
Open your GCash app and go to Pay Bills.
4
Search for NBI
Search for NBI or select it from the list of billers.
5
Enter the details
Enter the reference number and the amount, then confirm the transaction.
6
Save your receipt
Save the GCash confirmation as your payment receipt.
7
Check your payment status
Go back to your NBI account and check whether the payment status is updated. If it still shows pending, wait up to 24 hours before contacting support. Do not pay twice before confirming the first payment did not go through.
Renewal
NBI Clearance Renewal Online
If your clearance was issued in 2016 or later and your personal details have not changed, you can renew completely online without visiting any NBI office. Your renewed clearance will be delivered to your door.
1
Click the Renewal option
Go to clearance.nbi.gov.ph and click on the Renewal option.
2
Enter your old details
Enter your old NBI clearance number, mobile number, full name, and date of birth.
3
Review and verify
Review your details and click Verify.
4
Choose delivery or pickup
Fill the delivery form and choose between door-to-door delivery or personal pickup.
5
Pay the renewal fee
Pay the renewal fee using your preferred payment method.
6
Wait for SMS confirmation
Wait for an SMS confirmation with your reference number. Your renewed clearance will be delivered within 5 to 10 business days, or you can pick it up yourself if you chose the pickup method.
Fees & Validity
How Much Is NBI Clearance?
The standard NBI clearance fee is 155 pesos (130 pesos for processing and 25 pesos for the transaction fee). First-time job seekers are exempt under Republic Act 11261.
Door-to-door delivery
If you choose door-to-door delivery for your clearance, you pay an additional delivery fee on top of the regular fee. The amount depends on your location and the courier being used.
Validity period
Your NBI clearance is valid for one year from the date it was issued. After that, it expires and is no longer accepted for any official purpose, so you would need to renew it. It is best to apply for renewal before it expires, especially if you know you will need it for a job application or visa submission.
Note
If Your Details Have Changed
Renewal rules differ when your personal information is no longer the same.
If your personal details have changed since your last clearance (such as a name change after marriage), the NBI will treat it as a new application. You will need to book an in-person appointment, carry your old NBI clearance and two valid IDs to the nearest local NBI branch, and have your biometrics re-captured.
NBI Clearance Renewal Requirements
- Your original expired NBI clearance
- Two valid government-issued IDs
- Payment of the renewal fee
For online renewal with no changes to your personal details, no in-person visit is required.
Special Cases
NBI Clearance From Abroad and HIT Status
Guidance for overseas Filipinos, plus what a HIT actually means.
NBI Clearance From Abroad
For Filipinos already abroad who cannot return to the Philippines, you can submit a fingerprint card (Form No. 5) through the nearest Philippine Embassy. The embassy authenticates the fingerprint card, and you send it to the NBI’s Mailed Clearance Section in Manila.
What Is a Hit in NBI Clearance?
A hit does not automatically mean you have a criminal record. It means your name, birthdate, or other details matched someone else in the NBI database who has a pending case. This is common for people with common names.
What happens if you get a hit
If you get a hit, the NBI will notify you and ask for additional documents like a birth certificate or affidavit to confirm you are not the same person as the one in the record. Verification usually takes 5 to 10 working days but can take longer depending on the complexity of the case or the number of applications, as peak days can add further delays.
Good to Know
First-Time Job Seekers and Walk-In Policy
Two things worth knowing before you go.
First-Time Job Seekers
Under Republic Act 11261, first-time job seekers are eligible for a free NBI clearance certificate. To qualify, you must not have been previously employed and you need to present a barangay clearance certificate confirming your jobless status. When applying, select the first-time job seeker option on the NBI portal, which is separate from the regular application option.
Walk-In: Is It Still Possible?
The NBI has fully moved to an appointment-based system. Walk-in applications without a prior online booking are generally not accepted. Some branches may still accept walk-ins for senior citizens and persons with disabilities, but this is not guaranteed. Confirm with your local branch to avoid double visits. Always book your appointment online before visiting any branch.
Before You Visit
NBI Clearance Dress Code and Delivery
The NBI enforces a dress code at its offices. Here is what to wear, plus how delivery works.
Dress Code Policy
- Wear smart casual or semi-formal clothing
- Shorts are not allowed
- Sleeveless shirts and tank tops are not allowed
- Slippers are not allowed
- Applicants who are not dressed appropriately are usually denied entry
Wear something clean and presentable. Think of it the same way you would dress for a job interview.
NBI Clearance Delivery
For online renewals, you can choose door-to-door delivery of your clearance certificate, so you do not need to visit any office to pick it up. Delivery typically takes 5 to 10 business days depending on your location, and a delivery fee applies on top of the standard clearance fee.
Troubleshooting
Common Problems and How to Fix Them
Here are the problems people usually face while applying for NBI clearance, and what to do about them.
| Problem | What to Do |
|---|---|
| Hit status | Wait 5 to 10 working days. Bring additional IDs and documents for verification if asked. |
| Payment not showing | Wait 24 hours. If still not showing, contact your payment provider with your receipt. |
| No available appointment slots | Check other nearby NBI branches. Refresh the page regularly for cancellations. Book weeks in advance. |
| Wrong ID brought to appointment | Always check your application for which IDs you selected. Bring extra IDs just in case. |
| Missed appointment | Your payment is still valid. Log in and reschedule through the same process. |
| OTP not received | Wait 30 seconds and request a new one. Make sure your phone has a signal. |
| Website not loading | Clear your browser cache. Try a different browser. Chrome is recommended. |
| Lost reference number | Check your email or SMS for the confirmation sent after payment. Contact your payment provider. |
| Incorrect information on clearance | Visit the NBI branch with your documents and request a correction. |
| Lost NBI clearance | Log in to your account and download a new copy from the portal. |
Compare
NBI Clearance vs Police Clearance
Is the police clearance and NBI clearance the same? This is one of the most common questions people ask. The short answer is no, they are not the same.
NBI Clearance
Issued by the National Bureau of Investigation and checks a national database covering criminal cases filed across the country.
PNP / Police Clearance
Issued by the Philippine National Police and checks their own database, which covers police records on a national level.
Both are valid official documents but they serve different purposes and are issued by two different national-level agencies. Some employers require only one. Others require both. Always check what is specifically being asked for before you apply.
Offices
Verification, Centers and Office Hours
How to verify a clearance, and where the major NBI centers are located.
NBI Clearance Verification
You can verify the authenticity of any NBI clearance certificate through the official NBI portal at clearance.nbi.gov.ph. This is useful for employers and agencies that want to confirm a submitted clearance is genuine and has not been tampered with.
NBI Clearance Centers and Office Hours
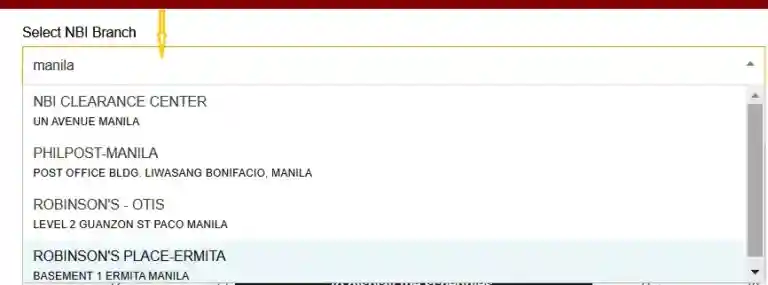
NBI clearance offices are open Monday to Friday from 8:00 AM to 5:00 PM except on public holidays. Major NBI clearance centers include:
- NBI Clearance Center, UN Avenue, Manila
- NBI Quezon City District Office
- NBI Robinsons Galleria Branch
- NBI Cebu Regional Office
- NBI Davao Branch
- NBI Cagayan de Oro Branch
- NBI Iloilo Branch
You can select your preferred branch during the online appointment booking process.
Need Help?
NBI Contact Details
If you need any assistance related to NBI clearance, reach out using the details below.
Trunkline
(632) 8524-8231 to 38
Office Hours
Monday to Friday, 8:00 AM to 5:00 PM
Website
clearance.nbi.gov.ph
Frequently Asked Questions
NBI Clearance FAQ
Quick answers to the most common questions about NBI clearance.
Conclusion
Get Your NBI Clearance With Less Hassle
You have learned how to apply for NBI clearance online, book an appointment, pay the fee, renew your clearance, and prepare the required documents. You also understand what HIT status means, how long the clearance is valid, and what to do if you face common problems. By following the correct steps and using the official NBI Clearance website, you can complete your application more smoothly, avoid delays, and get your NBI clearance with less hassle.


